【心得】Civic e:HEV (FL4) 霧燈改裝x Carmate GIGA BW584
延續上回的「後方向燈、倒車燈LED化」,這次接著分享Carmate GIGA S3500GSD LED雙色
霧燈(型號BW584)。
https://i.imgur.com/OI4tx8g.jpeg

由於往返公司通勤的路上,蠻容易因為天氣關係而起霧的,因此霧燈的使用頻率會比較高
。而現在車廠逐步將許多燈具LED化後,會發現在霧燈這個品項上,因為色溫、亮度和照
射範圍的關係,很容易淪為裝飾品。
為了提升霧中行駛的安全性,找到了日本Carmate GIGA 所推出的黃白雙棲型霧燈,內建
了6000K與3000K兩種色溫,並能記憶前一次開啟的顏色。保固年限為3年,不過一樣僅限
日本當地,但就這保固期的長度,品質與耐久應該是能讓人放心。
https://i.imgur.com/N5BH5AC.jpeg

https://i.imgur.com/Z6CmiIW.jpeg

https://i.imgur.com/PrYznK7.jpeg

https://i.imgur.com/2wmyiHl.jpeg

<商品內容>
Carmate GIGA S3500GSD LED雙色霧燈
型號:BW584
亮度:3500lm
色溫:6000K/3000K
規格:L1B
寬廣照射範圍、同時具有黃白雙色溫(可記憶)、分離式驅動器降低熱集中在LED燈體
保固3年(限日本國內)
購買價格:16,800日圓/SET
商品介紹連結(含可對應車型):
https://ps.carmate.co.jp/c/car/bw584
購買的話,如果剛好有去東京、大阪這些大城市,跑一趟可以免稅的Autobacs ,直接現
場買會比較划算。
https://i.imgur.com/ffnPfIW.jpeg

https://i.imgur.com/CsLjRXp.jpeg

https://i.imgur.com/kL6dG2J.jpeg

=====
原廠的霧燈配置為白光,亮度一般,照射範圍集中在車頭前方約1~2m左右,照地光型看起
來較為發散。
<戶外夜晚>
頭燈
https://i.imgur.com/iufG8jw.jpeg

頭燈+霧燈
https://i.imgur.com/MPuiE16.jpeg

https://i.imgur.com/koqnW6o.jpeg

小燈+霧燈
https://i.imgur.com/ctYG7Na.jpeg

https://i.imgur.com/H4w20Ag.jpeg

<地下停車場>
頭燈+霧燈
https://i.imgur.com/odFJgs1.jpeg

小燈+霧燈
https://i.imgur.com/zUNylJJ.jpeg

======
【安裝】
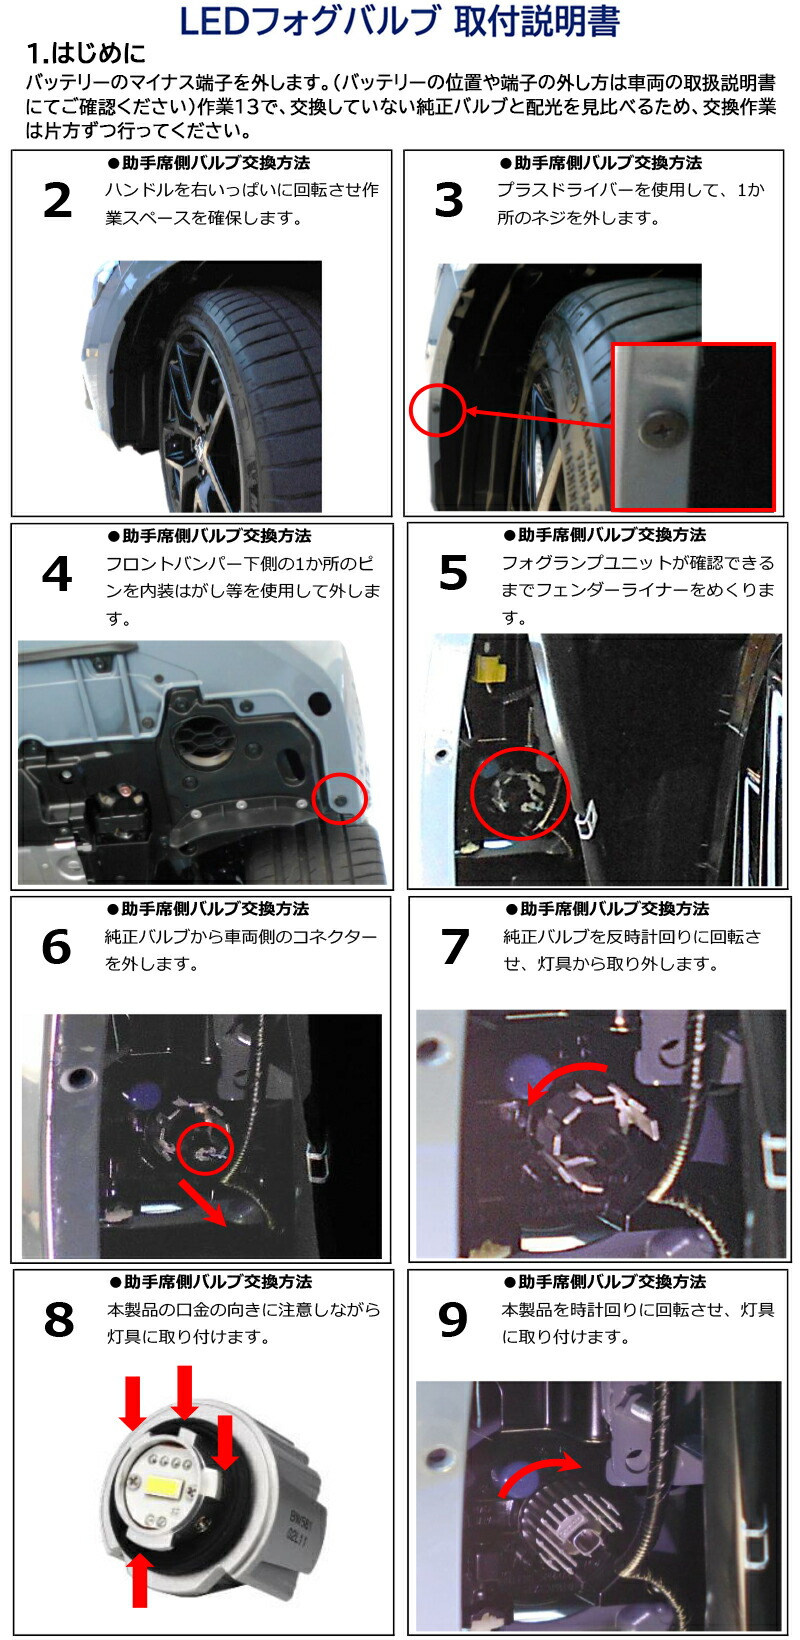
前霧燈的更換方式,可以照這份SOP進行。
https://reurl.cc/g63laQ
https://reurl.cc/xv2X6V
<準備工具>
- 十字起子
- 一字起子(後廂工具包有附)
- 10號套筒
- 斜口鉗
- 工作手套
<前置作業>
建議先將方向盤右打,以騰出作業空間。
<拆裝手順>
駕駛側
1. 以十字起子鬆脫保桿輪拱處螺絲。
2. 用一字起子撬開保桿下方固定扣。
3. 拉出輪拱護罩,即可看到霧燈座。
4. 鬆開霧燈連接器,逆時針轉出霧燈燈體。
5. 將霧燈新品順時針裝回燈座,插回連接器。
6. 確認燈泡是否正常點亮。
7. 以束帶固定霧燈驅動器,確保不晃動。
8. 復原輪拱護罩、扣回固定扣、鎖附螺絲,即可完成更換駕駛側霧燈。
https://i.imgur.com/2Ls6Umh.jpeg

https://i.imgur.com/GjALJ0H.jpeg

https://i.imgur.com/KkfglYV.jpeg

https://i.imgur.com/phrCanH.jpeg

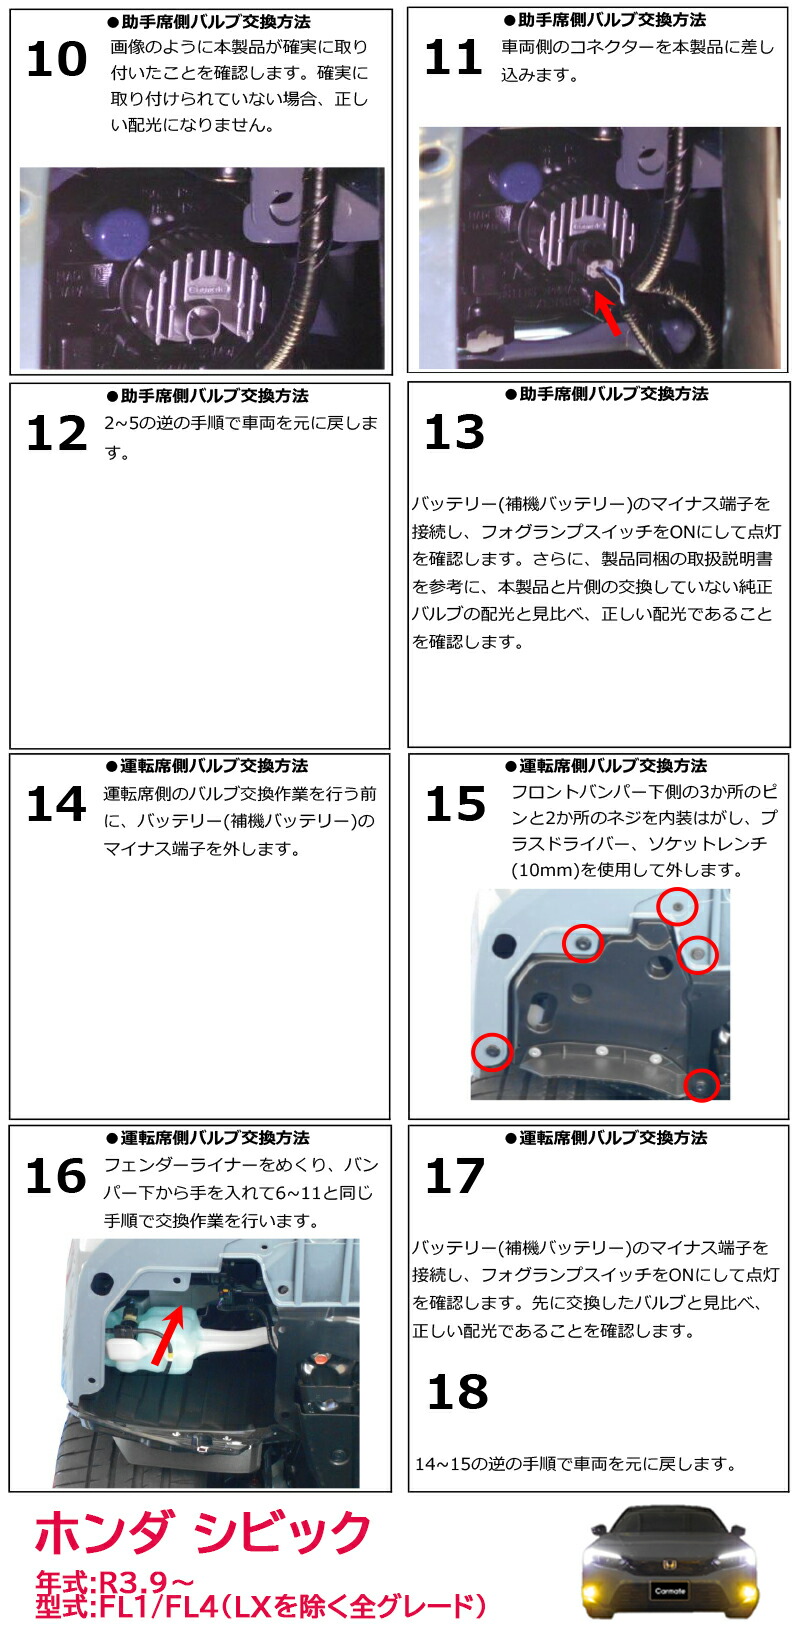
副駕駛側
1. 以一字起子撬開保桿下方固定扣(3顆)。
2. 以十字起子鬆開螺絲(1顆)。
3. 以10號套筒鬆開外六角螺絲(1顆)。
4. 拉出輪拱護罩,即可看到霧燈座。
5. 鬆開霧燈連接器,逆時針轉出霧燈燈體。
6. 將霧燈新品順時針裝回燈座,插回連接器。
7. 確認燈泡是否正常點亮。
8. 以束帶固定霧燈驅動器,確保不晃動。
9. 復原輪拱護罩、扣回固定扣、鎖附螺絲,即可完成更換駕駛側霧燈。
https://i.imgur.com/3DDpjF6.jpeg

https://i.imgur.com/ZIamV3s.jpeg

https://i.imgur.com/savyTvn.jpeg

https://i.imgur.com/vyN1TtU.jpeg

https://i.imgur.com/nSXsoQh.jpeg

整體過程算容易,可原車原地施工,但底盤離地高較低,副駕駛側的作業空間會有點侷促
,如果有改空套或是降車身的話,建議頂高施作。整體工時原則上1小時左右可以完成,
主要是整線的路徑和綁束帶會稍微花一點時間。
【完工照】
<戶外夜晚>
頭燈
https://i.imgur.com/JujPYUU.jpeg

https://i.imgur.com/ho9T2yQ.jpeg

頭燈+霧燈
https://i.imgur.com/nJKNf0F.jpeg

https://i.imgur.com/DAT6e3D.jpeg

https://i.imgur.com/VkAyE3u.jpeg

https://i.imgur.com/KnqmAc0.jpeg

https://i.imgur.com/tykuZhK.jpeg

https://i.imgur.com/Jrr0v02.jpeg

小燈+霧燈
https://i.imgur.com/EP2mbsT.jpeg

https://i.imgur.com/MwemwlI.jpeg

https://i.imgur.com/KWH4TXF.jpeg

https://i.imgur.com/oHonBne.jpeg

https://i.imgur.com/7SmJf0V.jpeg

https://i.imgur.com/aLGzdr7.jpeg

<地下停車場>
頭燈+霧燈
https://i.imgur.com/OLv226M.jpeg

https://i.imgur.com/uUPYApm.jpeg

小燈+霧燈
https://i.imgur.com/2FdOAKK.jpeg

https://i.imgur.com/5LFfwzg.jpeg

<全黑環境>
頭燈
https://i.imgur.com/83ef45t.jpeg

https://i.imgur.com/9Qi4XxQ.jpeg

https://i.imgur.com/puDQpPo.jpeg

頭燈+霧燈
https://i.imgur.com/hqYmr3P.jpeg

https://i.imgur.com/ajwPc8l.jpeg

https://i.imgur.com/yzOeGep.jpeg

https://i.imgur.com/1x85JZs.jpeg

https://i.imgur.com/rLB0Avl.jpeg

https://i.imgur.com/YWPsweM.jpeg

小燈+霧燈
https://i.imgur.com/WX2Spis.jpeg

https://i.imgur.com/RXqd9ib.jpeg

https://i.imgur.com/eoJqSly.jpeg

https://i.imgur.com/39WseEj.jpeg

https://i.imgur.com/SZeRpRW.jpeg

https://i.imgur.com/2k1q4et.jpeg

=====
【完工比較】
Civic e:HEV (FL4)原廠霧燈(OSRAM)x戶外夜晚
https://youtu.be/tXaFxlCQpuw
Civic e:HEV (FL4)更換BW584雙色霧燈x戶外夜晚
https://youtu.be/EK0aQTuT-BE
Civic e:HEV (FL4)原廠霧燈(OSRAM)x戶外夜晚(車內)
https://youtu.be/AW-nnyJbchc
Civic e:HEV (FL4)更換BW584雙色霧燈x戶外夜晚(車內)
https://youtu.be/IKO3NcD2TYQ
Civic e:HEV (FL4)更換BW584雙色霧燈x全黑環境
https://youtu.be/bbOxQdHwr9U
Civic e:HEV (FL4)更換BW584雙色霧燈x全黑環境(車內)
https://youtu.be/TTaYo9gs41o
=====
【心得】
更換至今的幾天內,還沒真正遇到濃霧的行車環境,這部分需要等待時機。
不過,就目前的場地測試,可以發現BW584這款霧燈的照射範圍更廣、更均勻,亮度也有
所提升。光型部分,不會因為前述的功能提升,蓋過原車頭燈的光型,造成打鳥的狀況,
頭燈與霧燈是同時扮演好適當的分工。
真正的濃霧挑戰,等未來有遇到再來分享。
至於操作上,跟一般霧燈一樣。而由於是黃白雙棲型,所以可以透過ON/OFF做切換的控制
,下次開啟時也會記憶最近一次的色溫。
色溫切換方式,在ON的狀態下,切OFF後的2~5秒內,切回ON,即可完成色溫切換。
https://i.imgur.com/larQJ7c.jpeg

那萬一遇到兩側一白一黃時,也不用擔心,點燈狀態下,在5秒內連續OFF/ON切換,即可
完成reset。
https://i.imgur.com/GYGMPRE.jpeg

而從原廠拆下的LED霧燈,為OSRAM生產的A32A 00A09。最後兩張為BW584與OSRAM A32A 00
A09的合照。
https://i.imgur.com/VDU3nGF.jpeg

https://i.imgur.com/wHRVG1F.jpeg

https://i.imgur.com/S9HrOyq.jpeg

https://i.imgur.com/xxQTlGe.jpeg

=====
10/09追加更新
補充霧燈光軸的調整,可藉由霧燈座及保桿下方的洞口,以10號套筒做霧燈高低角度的調
整~
https://i.imgur.com/BFaE29j.jpeg

https://i.imgur.com/FS3d74i.jpeg

https://i.imgur.com/nbqIkI4.jpeg

https://i.imgur.com/gWDnUj2.jpeg

調整基準參考了日本當地的建議,車頭距離牆壁3m的狀態下,水平高度約為霧燈中心高度
的4/5。
https://shiroyagi.naturum.ne.jp/e2822137.html

https://i.imgur.com/RovDBbQ.jpeg

在這樣的調整下,霧燈光型上緣可剛好頭燈光型下緣幾乎切齊,避免形成打鳥狀況。
https://youtu.be/IGzF-z_zk74
https://i.imgur.com/pkLHT0J.jpeg

https://i.imgur.com/I0Wordq.jpeg

https://i.imgur.com/37HykXy.jpeg

--
